Use Heat Orchestration Template (HOT) to prepare Murano Application Catalog in Mirantis OpenStack
Murano deals with applications while Heat orchestrates infrastructure. In fact Murano utilizes an infrastructure orchestration layer such as Heat to provision the underlying VMs, networking and storage. With Murano it is possible to upload applications written in the HOT (Heat Orchestration Template) format. This format is supported by the Murano CLI tool, which automatically generates a proper Murano application package from the HOT template supplied by the user. In Mirantis OpenStack both heat and murano are integrated through horizon to make the deployment simpler.
To prepare a catalog the following three components are needed:
Manifest will have the basic information about the catalog like name, description, tags etc.
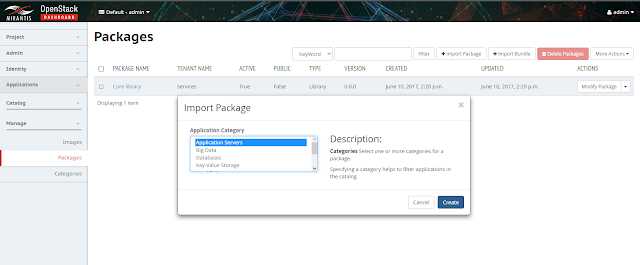
2. Click on Import Package and select the zip file:
4. Click next and select the "Application Category" but if the respective category is not available, first make sure to create that in the below tab of Packages in the left pan and then start the upload process again.
5. Once upload is complete the new catalog will be visible under Packages tab as mentioned in the below diagram:
6. Now go to Catalog tab and create one new environment and set the "Environment Default Network" as "Create New" as during the deployment new network will be created.
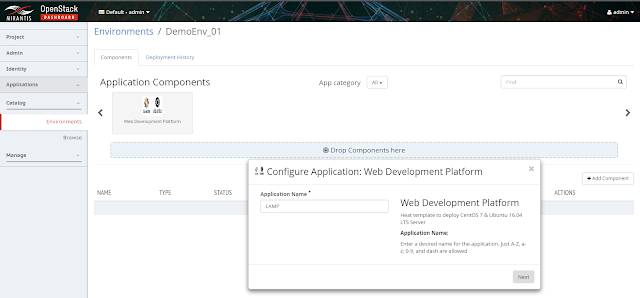
7. Now in Components section the new catalog is available. Drag the application component and drop on "Drop Components here" section. Then the catalog configuration will start in few phases along with all dynamic variable names as displayed in the below images:
8. After providing the name to the application select next to add few more names to certain specific components:
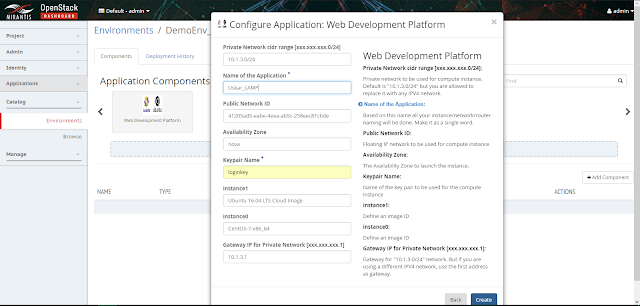
In the above Form add the valid "keypair Name" and "Name of the Application" and click "Create". Then the application environment is ready with the new catalog based inputs as displayed below:
9. To deploy the application click on "Deploy this Environment" button.
10. Once the deployment is done, all the components can be seen in their respective places:
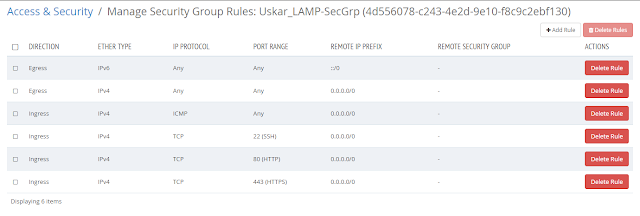
NOTE: In the above images its clear that the name given at the time of filling the form is populated for all the components from which its easy to identify the component easily as the same catalog can be used by multiple people with different names.
11. Under stack tab select the specific stack and go to Overview section where you can see the respective IPs as output:
12. Using these public IPs easily some one can reach to the instance:
13. To access the instances following command can be used from a linux client system using the mapped keypair:
In the similar way more customization can be done to generate the form through catalog and that can make the whole deployment simple and faster ! :)
To prepare a catalog the following three components are needed:
- manifest.yaml
- logo.png
- template.yaml
Manifest will have the basic information about the catalog like name, description, tags etc.
# cat manifest.yaml
Format: Heat.HOT/1.0
Type: Application
FullName: io.murano.apps.Platform
Name: Web Development Platform
Description: "Heat template to deploy
CentOS 7 & Ubuntu 16.04 LTS Server"
Author: Udayendu Kar
Tags:
-
hot-based
Logo:
-
logo.png
Logo is used to indicate the application so the from the list of catalogs some one can easily choose the required application and select for the deployment. It need to be in .png format and should be a PNG type file.
Template is nothing but a HOT file written in YAML. There are many ways to write the HOT file but while deploying through Murano as an application catalog, its always good to make it as a form so that end user will get the flexibility to customize it as per their requirement.
To know how to write a HOT file using yaml refer my previous blog post:
Here is the content of one template.yaml file which will deploy two instances with complete network, storage mapping. During the time of deployment it will generate a form to connect some dynamic information every time and same template can be used multiple times.
NOTE: Just you have to fix the public network ID as that wont change every time. But if you have multiple network for floating IP then even that can be dynamically integrated to the template.
Once the above three components will be ready, need to make a zip file with all these which will work as an application catalog. This catalog need to be uploaded to Horizon for future use.
Lets make a directory called Murano and keep all the components there and make the zip there:
# mkdir /root/Murano
# tree Murano
Murano
├── logo.png
├── manifest.yaml
└── template.yaml
heat_template_version: 2015-10-15
description: Deploy Ubuntu 16.04 LTS & CentOS 7 Cloud image
through Murano Catalog
parameters:
key_name:
type: string
label: Keypair Name
description: Name of
the key pair to be used for the compute instance
Sname:
type: string
label: Name of the
Application
description: Based on
this name all your instance/network/router naming will be done. Make it as a
single word.
image_ID1:
type: string
label: instance0
description: Define an
image ID
default:
CentOS-7-x86_64
image_ID2:
type: string
label: instance1
description: Define an
image ID
default: Ubuntu 16.04
LTS Cloud Image
cidr_private:
type: string
label: Private Network
cidr range [xxx.xxx.xxx.0/24]
description: Private
network to be used for compute instance. Default is "10.1.3.0/24" but
you are allowed to replace it with any IPV4 network.
default: 10.1.3.0/24
private_gw:
type: string
label: Gateway IP for
Private Network [xxx.xxx.xxx.1]
description: Gateway
for "10.1.3.0/24" network. But if you are using a different IPV4
network, use the first address as gateway.
default: 10.1.3.1
public_net:
type: string
label: Public Network
ID
description: Floating
IP network to be used for compute instance
default:
41205ad5-eabe-4eea-ab5c-258eec81cbde
availability_zone:
type: string
description: The Availability
Zone to launch the instance.
default: nova
resources:
heat_network_01:
type: OS::Neutron::Net
properties:
admin_state_up: true
name:
list_join: ['-', [
{ get_param: Sname }, 'private_net' ]]
heat_subnet_01:
type:
OS::Neutron::Subnet
properties:
name:
list_join: ['-', [
{ get_param: Sname }, 'private_subnet' ]]
cidr: { get_param:
cidr_private }
enable_dhcp: true
gateway_ip: {
get_param: private_gw }
network_id: {
get_resource: heat_network_01 }
heat_router_01:
type:
OS::Neutron::Router
properties:
admin_state_up: true
name:
list_join: ['-', [
{ get_param: Sname }, 'router' ]]
heat_router_01_gw:
type: OS::Neutron::RouterGateway
properties:
network_id: {
get_param: public_net }
router_id: {
get_resource: heat_router_01 }
heat_router_interface:
type:
OS::Neutron::RouterInterface
properties:
router_id: {
get_resource: heat_router_01 }
subnet_id: {
get_resource: heat_subnet_01 }
secgrp_id:
type:
OS::Neutron::SecurityGroup
properties:
name:
list_join: ['-', [
{ get_param: Sname }, 'SecGrp' ]]
rules:
-
remote_ip_prefix: 0.0.0.0/0
protocol: tcp
port_range_min:
80
port_range_max:
80
-
remote_ip_prefix: 0.0.0.0/0
protocol: tcp
port_range_min:
22
port_range_max:
22
-
remote_ip_prefix: 0.0.0.0/0
protocol: icmp
-
remote_ip_prefix: 0.0.0.0/0
protocol: tcp
port_range_min:
443
port_range_max:
443
server1_port:
type:
OS::Neutron::Port
properties:
network_id: {
get_resource: heat_network_01 }
fixed_ips:
- subnet_id: {
get_resource: heat_subnet_01 }
security_groups:
- {get_resource:
secgrp_id}
server1_floating_ip:
type:
OS::Neutron::FloatingIP
properties:
floating_network_id:
{ get_param: public_net }
port_id: {
get_resource: server1_port }
server1:
type: OS::Nova::Server
properties:
availability_zone: {
get_param: availability_zone }
name:
list_join: ['-', [
{ get_param: Sname }, 'CentOS7' ]]
key_name: { get_param:
key_name }
block_device_mapping: [{ device_name: "vda", volume_id : {
get_resource : CentOS7_Disk }, delete_on_termination : "true" }]
flavor:
"m1.small"
networks:
- port: {
get_resource: server1_port }
CentOS7_Disk:
type:
OS::Cinder::Volume
properties:
name:
list_join: ['-', [
{ get_param: Sname }, 'CentOS7_Disk' ]]
image: { get_param:
image_ID1 }
size: 10
server2_port:
type:
OS::Neutron::Port
properties:
network_id: {
get_resource: heat_network_01 }
fixed_ips:
- subnet_id: {
get_resource: heat_subnet_01 }
security_groups:
- {get_resource:
secgrp_id}
server2_floating_ip:
type:
OS::Neutron::FloatingIP
properties:
floating_network_id:
{ get_param: public_net }
port_id: {
get_resource: server2_port }
server2:
type: OS::Nova::Server
properties:
availability_zone: {
get_param: availability_zone }
name:
list_join: ['-', [
{ get_param: Sname }, 'Ubuntu16LTS' ]]
key_name: {
get_param: key_name }
block_device_mapping: [{ device_name: "vda", volume_id : {
get_resource : Ubuntu16.04_Disk }, delete_on_termination : "true" }]
flavor:
"m1.small"
networks:
- port: { get_resource: server2_port }
Ubuntu16.04_Disk:
type:
OS::Cinder::Volume
properties:
name:
list_join: ['-', [
{ get_param: Sname }, 'Ubuntu16-04_Disk' ]]
image: { get_param:
image_ID2 }
size: 10
outputs:
server1_private_ip:
description: IP
address of server1 in private network
value: { get_attr: [
server1, first_address ] }
server1_public_ip:
description: Floating
IP address of server1 in public network
value: { get_attr: [
server1_floating_ip, floating_ip_address ] }
server2_private_ip:
description: IP
address of server2 in private network
value: { get_attr: [
server2, first_address ] }
server2_public_ip:
description: Floating
IP address of server2 in public network
value: { get_attr: [
server2_floating_ip, floating_ip_address ] }
Once the above three components will be ready, need to make a zip file with all these which will work as an application catalog. This catalog need to be uploaded to Horizon for future use.
Lets make a directory called Murano and keep all the components there and make the zip there:
# mkdir /root/Murano
# tree Murano
Murano
├── logo.png
├── manifest.yaml
└── template.yaml
Make a zip file with the above three:
# zip MuranoDemo.zip logo.png manifest.yaml template.yaml
Once MuranoDemo.zip file will be ready, login to Mirantis OpenStack's horizon dashboard and then follow the below steps:
1. Go to Manage -> Packages:
2. Click on Import Package and select the zip file:
3. Once you will click next all the default value will be loaded. Just you need to select it as 'Public' if you want this catalog to be visible by other tenants.
4. Click next and select the "Application Category" but if the respective category is not available, first make sure to create that in the below tab of Packages in the left pan and then start the upload process again.
5. Once upload is complete the new catalog will be visible under Packages tab as mentioned in the below diagram:
6. Now go to Catalog tab and create one new environment and set the "Environment Default Network" as "Create New" as during the deployment new network will be created.
7. Now in Components section the new catalog is available. Drag the application component and drop on "Drop Components here" section. Then the catalog configuration will start in few phases along with all dynamic variable names as displayed in the below images:
8. After providing the name to the application select next to add few more names to certain specific components:
In the above Form add the valid "keypair Name" and "Name of the Application" and click "Create". Then the application environment is ready with the new catalog based inputs as displayed below:
9. To deploy the application click on "Deploy this Environment" button.
10. Once the deployment is done, all the components can be seen in their respective places:
NOTE: In the above images its clear that the name given at the time of filling the form is populated for all the components from which its easy to identify the component easily as the same catalog can be used by multiple people with different names.
11. Under stack tab select the specific stack and go to Overview section where you can see the respective IPs as output:
12. Using these public IPs easily some one can reach to the instance:
➤
ping 10.133.60.97
Pinging 10.133.60.97 with 32 bytes of data:
Reply from 10.133.60.97: bytes=32 time=306ms TTL=51
Reply from 10.133.60.97: bytes=32 time=216ms TTL=51
Reply from 10.133.60.97: bytes=32 time=232ms TTL=51
Reply from 10.133.60.97: bytes=32 time=251ms TTL=51
Ping statistics for 10.133.60.97:
Packets: Sent = 4,
Received = 4, Lost = 0 (0% loss),
Approximate round trip times in milli-seconds:
Minimum = 216ms,
Maximum = 306ms, Average = 251ms
➤
ping 10.133.60.98
Pinging 10.133.60.98 with 32 bytes of data:
Reply from 10.133.60.98: bytes=32 time=227ms TTL=51
Reply from 10.133.60.98: bytes=32 time=227ms TTL=51
Reply from 10.133.60.98: bytes=32 time=209ms TTL=51
Reply from 10.133.60.98: bytes=32 time=213ms TTL=51
Ping statistics for 10.133.60.98:
Packets: Sent = 4,
Received = 4, Lost = 0 (0% loss),
Approximate round trip times in milli-seconds:
Minimum = 209ms,
Maximum = 227ms, Average = 219ms
13. To access the instances following command can be used from a linux client system using the mapped keypair:
For
CentOS System:
➤ ssh -i loginkey.pem centos@10.133.60.97
[centos@uskar-lamp-centos7 ~]$ sudo su -
[root@uskar-lamp-centos7 ~]# ifconfig
eth0: flags=4163<UP,BROADCAST,RUNNING,MULTICAST> mtu 1500
inet 10.1.3.4 netmask 255.255.255.0 broadcast 10.1.3.255
inet6
fe80::f816:3eff:fe31:33bd prefixlen
64 scopeid 0x20<link>
ether
fa:16:3e:31:33:bd txqueuelen 1000 (Ethernet)
RX packets
504 bytes 51095 (49.8 KiB)
RX errors 0 dropped 0
overruns 0 frame 0
TX packets
460 bytes 48280 (47.1 KiB)
TX errors 0 dropped 0 overruns 0 carrier 0
collisions 0
lo: flags=73<UP,LOOPBACK,RUNNING> mtu 65536
inet
127.0.0.1 netmask 255.0.0.0
inet6 ::1 prefixlen 128
scopeid 0x10<host>
loop txqueuelen 1
(Local Loopback)
RX packets 6 bytes 416 (416.0 B)
RX errors 0 dropped 0
overruns 0 frame 0
TX packets 6 bytes 416 (416.0 B)
TX errors 0 dropped 0 overruns 0 carrier 0
collisions 0
For Ubuntu System:
➤ ssh -i loginkey.pem ubuntu@10.133.60.98
ubuntu@uskar-lamp-ubuntu16lts:~$ sudo su -
root@uskar-lamp-ubuntu16lts:~# ifconfig
ens3 Link
encap:Ethernet HWaddr fa:16:3e:46:fd:00
inet
addr:10.1.3.5 Bcast:10.1.3.255 Mask:255.255.255.0
inet6 addr:
fe80::f816:3eff:fe46:fd00/64 Scope:Link
UP BROADCAST
RUNNING MULTICAST MTU:1500 Metric:1
RX packets:8865
errors:0 dropped:0 overruns:0 frame:0
TX packets:8817
errors:0 dropped:0 overruns:0 carrier:0
collisions:0
txqueuelen:1000
RX bytes:731942
(731.9 KB) TX bytes:735159 (735.1 KB)
lo Link encap:Local
Loopback
inet
addr:127.0.0.1 Mask:255.0.0.0
inet6 addr:
::1/128 Scope:Host
UP LOOPBACK
RUNNING MTU:65536 Metric:1
RX packets:160
errors:0 dropped:0 overruns:0 frame:0
TX packets:160
errors:0 dropped:0 overruns:0 carrier:0
collisions:0
txqueuelen:1
RX bytes:11840
(11.8 KB) TX bytes:11840 (11.8 KB)
In the similar way more customization can be done to generate the form through catalog and that can make the whole deployment simple and faster ! :)


Comments
Post a Comment