Posts

Showing posts from 2019

Docker Cheat Sheet

1. Either use pip3 on an ubuntu server and install docker:         # apt-get install python3-pip -y    # pip3 install docker    # pip3 install --upgrade docker 2. Or use apt-get on ubunytu to install docker:         # apt-get install docker.io -y 3. Start and enable docker service:         # systemctl start docker    # systemctl enable docker    Check the status of docker:    # systemctl status docker 4. To check the docker version and docker system wide information:         # docker -v    # docker info 5. To search docker image in docker registry:          # docker search httpd    To check a specific version of image:      # docker search ubuntu:18.04 6. To download docker images:     # docker pull ubuntu:18.04     18.04: Pulling from library/ubuntu     5667fdb72017: Pull complete     d83811f270d5: Pull complete     ee671aafb583: Pull complete     7fc152dfb3a6: Pull complete     Digest: sha256:b88f8848e9a1a4e4558ba7cfc4acc5879e1d0e7ac064014090

VMware OVA deployment using ansible

To deploy OVA on VMware platform using ansible a provision server is required from where ansible playbooks need to be executed. Follow the steps as mentioned in  how to build ansible provision server for VMware  and make the provision server ready. With the help of vmware_deploy_ovf  module ansible can deploy VMware OVA. Let say the requirement is to deploy the OVA in a vm folder and under a resource pool in hosts view, then it should go through the following check points: Create vm folder and resource pool if not present OVA should be available in the provision server Before deploying the OVA, extract the OVA and check the custom section of .ovf file to see what all variable need to pass in the playbook at the time of deployment. We will create three yml files to keep: vmware ova deployment code ( vsphere_ova_deploy.yml ) vmware environment login details ( vsphere_creds.yml ) variables used for the guest deployment ( vsphere_var.yml ) In my example, I have t

VMware guest deployment using Ansible

To deploy VMware guest using ansible a provision server is required from where ansible playbooks need to be executed. Follow the steps as mentioned in  how to build ansible provision server for VMware  and make the provision server ready. We will create three yml files to keep: vmware guest deployment code ( vsphere_guest_deploy.yml ) vmware environment login details ( vsphere_creds.yml ) variables used for the guest deployment ( vsphere_var.yml ) This vsphere_guest_deploy.yml playbook will perform the following tasks: Make sure to have a template in the vCenter Server VM need to be deployed in a dedicated vm folder and resource pool VM folder and resource pool will be created if not available For this deployment an application user is needed in vCenter which should have required privilege to perform all the above tasks.  Content of vCenter credentials yml file: Content of vCenter variable file: Content of vmware guest deployment yml:

How to build Ansible provision server for VMware ?

Ansible is a great automation tool for infrastructure as a code and using ansible modules to automate VMware platform is really easy. In order to start the automation, need to configure a provision server where ansible and some of its dependencies need to be installed. A provision server can be on any operating system. But in this document we have focused on the following two opensource operating systems: Ubuntu 20.04 LTS CentOS 8.x  Following steps need to be performed to configure Ubuntu 20.04 LTS as a provision server: a. Install python3-pip:     # apt-get  install  python3-pip  -y    Upgrade pip3 to the latest version:   # pip3  install  --upgrade  pip b. Install & check latest ansible  version:       # pip3 install ansible   # pip3 show ansible      c.  Install & check  pyVmomi :       # pip3 install pyvmomi   # pip3 show pyvmomi Following steps need to be performed to configure CentOS 8.x as a provision server: a. Install

How to configure Linux KVM bridge on Ubuntu 18.04 & 20.04 LTS ?

Image
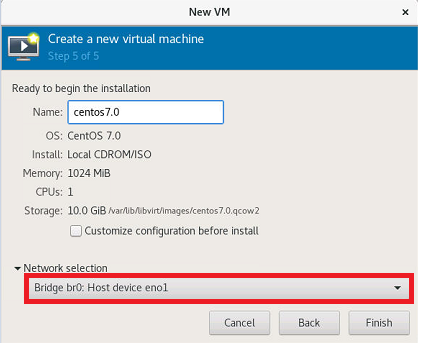
1. Install all the required KVM packages:    # apt install qemu-kvm libvirt-clients libvirt-daemon-system bridge-utils virt-manager   -y 2. Start and enable 'libvirtd' daemon:    # systemctl start libvirtd     # systemctl enable libvirtd    # systemctl status libvirtd 3. Login to the KVM host using console or do SSH:    ➤  ssh -l root kvmhost.example.com    The default config file will look like below: # cat  /etc/netplan/50-cloud-init.yaml network:     ethernets:         eno1:             addresses:             - 192.168.0.3/24             dhcp4: false             gateway4: 192.168.0.1             nameservers:                 addresses:                 - 192.168.125.100                 search:                 - example.com         eno2:             addresses: []             dhcp4: true             optional: true         eno3:             addresses: []             dhcp4: true             optional: true         eno4:             addres

VNC Configuration using Ansible in CentOS 6

Image
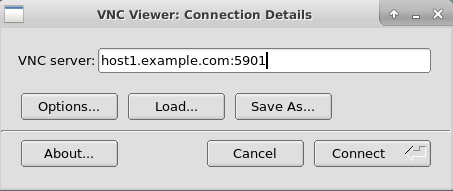
1. Install epel repo on CentOS 6 system:     # yum install epel-release  -y 2. Install ansible using yum:     # yum install ansible  -y 3. Go to the '/etc/ansible/roles' directory and run the below command to create the required directory structure:     # ansible-galaxy  init  vnc6  --offline        - vnc6 was created successfully   # tree vnc6        vnc6     ├── defaults     │   └── main.yml     ├── files     ├── handlers     │   └── main.yml     ├── meta     │   └── main.yml     ├── README.md     ├── tasks     │   └── main.yml     ├── tests     │   ├── inventory     │   └── test.yml     └── vars         └── main.yml     4. Create the service file 'vncservers' in '/etc/ansible/roles/vnc6/files/' to allow 'root' user to access the vncserver using port 5901:     # cat  vncservers             VNCSERVERS="1:root"     VNCSERVERARGS[1]="-geometry 1200x1000" 5. Modify the 'main.yaml' file in

xRDP configuration on Ubuntu 16.04, 18.04 & 20.04 LTS Server and Desktop

Image
xRDP is one of the most commonly used opensource remote desktop protocol (rdp). By following the below steps it can easily be configured on different flavors of Ubuntu system. Configuration : a. Login to the Ubuntu server as 'root' and run the update: # apt-get update && apt-get upgrade -y b. Install the 'xfce4' desktop environment: # apt-get install xfce4 xfce4-goodies -y c. Install the 'xrdp' package: # apt-get install xorgxrdp xrdp -y d. Enable the 'xfce4-session' for both 'ubuntu' and 'root' user: # echo xfce4-session >~/.xsession # su - ubuntu $ echo xfce4-session >~/.xsession Now the system is ready. You can login to the system using RDP via 'root' or 'ubuntu' user along with their own password. NOTE : If 'ufw' is enabled, make sure to allow the network access to RDP this system. To check the 'ufw' status: # ufw status To allo