How to configure Linux KVM bridge on Ubuntu 18.04 & 20.04 LTS ?
1. Install all the required KVM packages:
# apt install qemu-kvm libvirt-clients libvirt-daemon-system bridge-utils virt-manager -y
2. Start and enable 'libvirtd' daemon:
# systemctl start libvirtd
# systemctl enable libvirtd
# systemctl status libvirtd
3. Login to the KVM host using console or do SSH:
➤ ssh -l root kvmhost.example.com
The default config file will look like below:
# cat /etc/netplan/50-cloud-init.yaml
network:
ethernets:
eno1:
addresses:
- 192.168.0.3/24
dhcp4: false
gateway4: 192.168.0.1
nameservers:
addresses:
- 192.168.125.100
search:
- example.com
eno2:
addresses: []
dhcp4: true
optional: true
eno3:
addresses: []
dhcp4: true
optional: true
eno4:
addresses: []
dhcp4: true
optional: true
version: 2
4. Modify '/etc/netplan/50-cloud-init.yaml' file to look like below:
network:
ethernets:
eno1:
dhcp4: no
bridges:
br0:
interfaces: [eno1]
addresses:
- 192.168.0.3/24
dhcp4: false
gateway4: 192.168.0.1
nameservers:
addresses:
- 192.168.125.100
search:
- example.com
eno2:
addresses: []
dhcp4: true
optional: true
eno3:
addresses: []
dhcp4: true
optional: true
eno4:
addresses: []
dhcp4: true
optional: true
version: 2
5. Run the below command to activate the configuration and validate it:
# netplan apply
# networkctl status
● State: routable
Address: 192.168.122.1 on virbr0
192.168.0.3 on br0
fe80::fc54:ff:fe28:1024 on vnet0
fe80::fc1a:eeff:fe89:7651 on br0
Gateway: 192.168.0.1 (Lab Inc) on br0
DNS: 192.168.125.100
Search Domains: example.com
To check only the bridge interface:
# brctl show
bridge name bridge id STP enabled interfaces
br0 8000.fe1aee897651 no eno1
eno3 8000.364b4e33de58 no
virbr0 8000.5254006b0d43 yes virbr0-nic
# networkctl status br0
● 12: br0
Link File: /lib/systemd/network/99-default.link
Network File: /run/systemd/network/10-netplan-br0.network
Type: ether
State: routable (configured)
Driver: bridge
HW Address: fe:1a:ee:89:76:51
Address: 192.168.0.3
fe80::fc1a:eeff:fe89:7651
Gateway: 192.168.0.1 (Lab Inc)
DNS: 192.168.125.100
Search Domains: example.com
# ifconfig br0
br0: flags=4163<UP,BROADCAST,RUNNING,MULTICAST> mtu 1500
inet 192.168.0.3 netmask 255.255.255.0 broadcast 192.168.0.255
inet6 fe80::fc1a:eeff:fe89:7651 prefixlen 64 scopeid 0x20<link>
ether fe:1a:ee:89:76:51 txqueuelen 1000 (Ethernet)
RX packets 12905 bytes 1183745 (1.1 MB)
RX errors 0 dropped 1885 overruns 0 frame 0
TX packets 8750 bytes 5653021 (5.6 MB)
TX errors 0 dropped 0 overruns 0 carrier 0 collisions 0
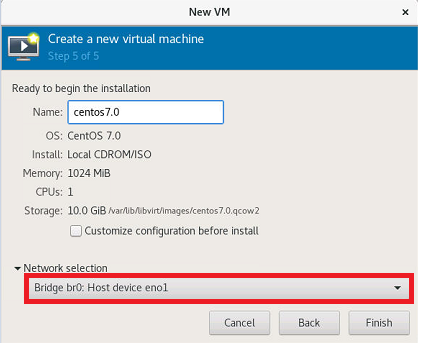
Finally the KVM bridge is ready and can be mapped to your virtual machines now.


Comments
Post a Comment